Wednesday 31 October 2012

Empire Celestial Hurricanum - Pushing Plastic To It's Limit!

The Celestial Hurricanum is one of the most finely detailed models that I have come across. From the leather bound books stored inside the caravan, the carving on the floor, the embossed lettering and even the rivets on the horses armour barding has left me very impressed.

The model is on the standard size chariot base (50mm x 100mm) to give you an indication of the overall size. I think that it is safe to say that my '00' paint brush, usual saved for eye balls etc., has never been so busy.

Within the game the vehicle can make your nearby troops harder to hit and gives your forces magic bonuses. It moves like a standard chariot, it has a stat line that is mediocre in fighting, but it is not designed for a fight more so boosting other troops around it.


The overall model shows two warhorses pulling a top heavy chariot with magical orbs on a strange turning mechanism.


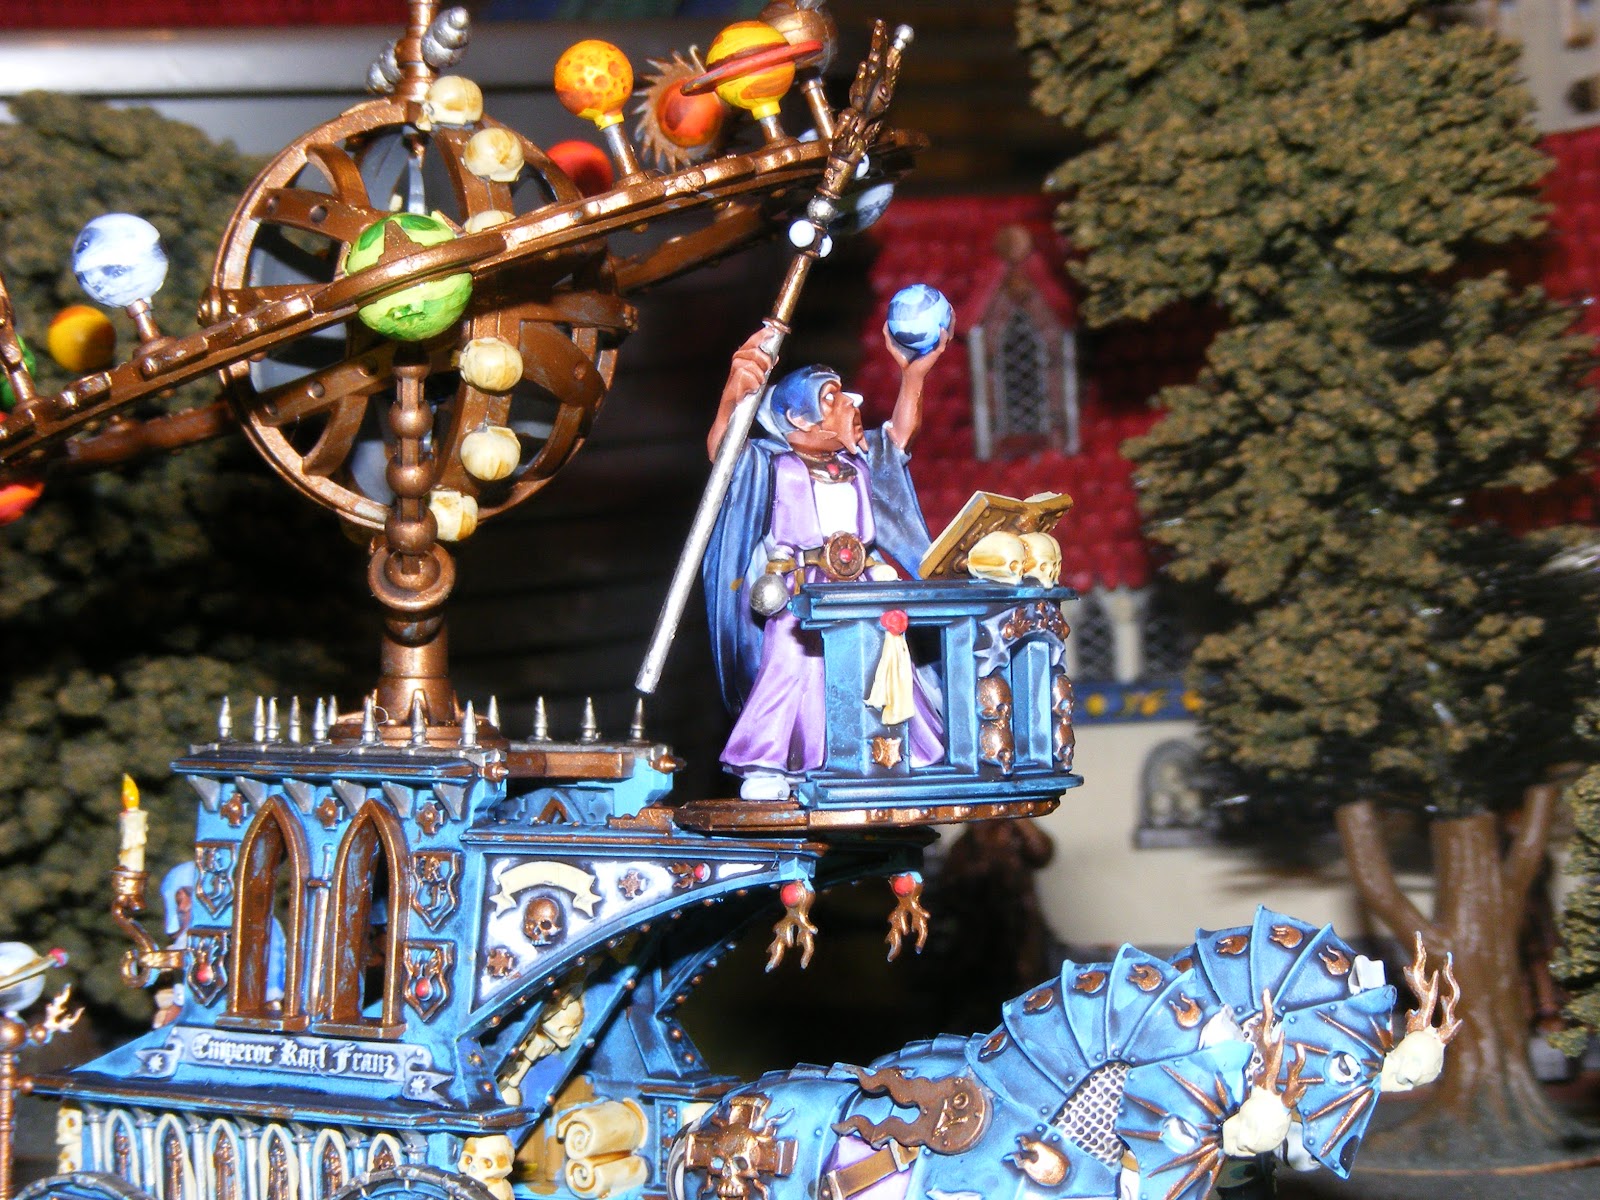
The first acolyte is based on a 'bridge' that has a clear view of the battle field. (Yes I have painted the facial hair since this photo was taken.)


The second acolyte is collecting books and scrolls, no doubt containing all the spells required for the up coming battle.


The name 'Celestial Hurricanum' implies some connection with the heavens, so the colouring of the orbs reflected strange looking planets and other objects of the sky.


Matching coloured horses pull the heavy chariot into battle.


There is space to place optional objects such as telescopes on the railing but I did not feel the need to us any for fear of hiding the acolyte.


This little beauty has taken me close to two days to paint and has taken me longer than any other model including the Empire Steam tank but I have enjoyed all of it. I just hope it keeps its place in the army and does not prove to be a damp squib.

Sunday 28 October 2012

Refurbishing Hell-blaster Guns - Budget Wargaming

Hell blasters are definitely worth considering when building an Empire army. Around a year ago I bought two great cannons and two hell blasters for around £10. They were badly painted and the crew had missing parts, or in some cases missing crew members. 

I included step by step photos in a previous blog post of Refurbishing Cannons where I stripped with Detol and then repainted, replacing missing parts during the process.

This week it was the turn of two Hell Blasters.  


The one on the left has all of the original metal crew where as the one on the right only has one of the original crew and two replacements.


This close up shows the two replacement crew members. The bodies are from Empire militia with some Luminark crewman arms and a head. The other guy (with the hat) changed his sword for the top part of a demigryph lance and his entire right arm with a dwarf crewmen arm.


Hopefully the mini diorama will give the impression of the crew testing wind direction and speed in order to calculate their shot. 


The standard crew look like they are reloading and adjusting the Hell Blaster ready for the nest shot. I found it important with the metal figures to pin them to the base as well as glueing to help make them robust when playing.


The bases are chariot size bases (50mm x 100mm) to give a standard size for the big guns in the Empire Army. As with all of my metal miniature I gave them a generous 'purity seal' coating to help resist against the paint chipping.

In total I saved around £50 for the refurb, four machine at £15.50, a total of £62 each rather than the £10 I paid second hand. I would advise checking any photos on ebay carefully before buying as some models are too far gone to rescue.

Is My Flag Bigger Than Your Flag? - Battle Standard Bearer for the Empire

Just a quick blog to show a Battle Standard Bearer from the Empire Army. I built this guy in the standard way and tried to match the paintwork to the book to the best I could. The only exception to the standard build was the exclusion of the model griffon.


I think the leather ropes need another layer to make them look more like bindings. I am not sure how often this guy will come out to play as my empire army is based around cavalry and 'on foot' he will struggle to keep up.


Wagon From An Alternative Manufacturer - 4ground.co.uk

I have often been intrigued with models made with laser cutters. Being able to transform a 2D design into a 3D object is quite clever.With this in mind I decided to try out a General Purpose Wagon from www.4ground.co.uk.


I have included the blank sprue once the kit has been made. It is around A5 in size.


The above photos shown the kit assembled with the optional canopy hoops.


Under coated in grey.


A simple paint job with basic washes gives it table top standard look.

The kit was easily put together using wood glue. The instructions consist of step by step photographs with text explaining the content. The scale fits in well with the 28mm scale figures and the price of £5 is about right. I will use as scenery rather than models in the game as it is brittle. If you drop this or lean on it it will break and stay broken so I would be reluctant to by any more purely for this reason. I am just too clumsy and need more robust models. 

Visitor To The Man Cave or New Ogre Release?

Definitely had a 'What the hell?' moment when a hedgehog came into the shed after the cat food left out for the pets. I have seen hedgehogs outside in the garden but as anyone who knows about hedgehogs knows they are not only nocturnal but also very shy.


With the weather turning cold this little fellah is probably getting ready for his winter hibernation by eating all the cat food he can get his spikes on.


I must admit that while he was exploring the shed I was wondering what army he is best suited for. Hopefully he'll be back in the spring.

Painting An Abbey - Warhammer Fantasy Buildings


I have had several of the buildings from Games Workshop for a while now. They have even been used in many of the battle reports on the www.wargamingforfun.com and youtube battle reports. It is only recently that I have made an effort to paint them properly rather than the spray the walls and roof technique.

This week it was the turn of the Abbey. I decided to paint the statues on the side bronze rather than carved stone. A black was over stone grey boulders. A blue band with yellow iconography around the middle. 


I decided to use both the roof window and the trap door to hide the missing tiles of the kit. Still not decided whether the torch on the left hand side of the door will be repaired yet.


I am still not sure about the clock with the yellow hands but I can always come back to it if needed. I completed it with a purity seal to protect the structure over the many years that it will feature on the battle field.

Sunday 21 October 2012

Refurbishing Empire Cannons - Budget Wargaming

Around twelve months ago I picked up a couple of Empire Great Cannons off of Ebay for around £5.00 including the postage. At the current time of writing a brand new Empire kit will set you back £15.50 so quite a saving on new retail but they were far from 'as new' condition. I cleaned the figures using Detol, the disinfectant removes the paint without damaging the plastic underneath. Stripping them back to the original grey. I then sprayed the cannons in plate mail silver from the Army Painter range of primers.


After the clean up process the crew looked like this. You'll notice some missing heads but the figures are mainly intact with minor repairs required.


I then cut two pieces of 3mm acrylic to the same size as a chariot. These will be the bases for the cannons and crew.


The two bases were covered in my 'washed building sand' mix with a focus of larger bits at the one end to resemble boulders. These components are held in place with PVA glue.


I then spent some time experimenting with different positions of the figures to tell a narrative when in place.


Spare heads form other Empire kits were used as replacements. You will also notice the rolled up blankets placed upon the cannon to hide a missing bracket.


Paper clips can also be used to add a unique appearance to figures but giving them hooks.


The two cannons side by side showing similar but different basing. I have painted them in the red and white colours to match the rest of my Empire force.


The base is earth with a light grey dry brush to pick out the stones and grains of sand. The grass is tufts glued into place using super glue gel. This glue also holds the cannon and figures in place. Only when posting this photo did I realise that I had not painted the flame on the end of the firers stick!


Close ups show a perfectly acceptable models. (I do need to tidy the models but wanted to take photos for the blog, spot the white paint on the ramrod!)


By comparing this photo with the above you will notice the rolled up blankets from the pistoleers kit used to hid the missing bracket of the cannon. A lot easier than crafting another bracket from scratch and aids in the narrative of the figures. 


 Yes the blond does have the head from the demigryph kit. The line down the side of the gun barrel in near invisible when not under the macro lens and flash lighting of the camera.

All in all it would be hard to tell that these are reconditioned rather than new. I feel that the skin tones are still too dark at the moment, as with some of the leather work, still nothing five minutes of highlighting would not cure. In total a saving of around £26, bargain. 

I think in the future I may set myself a challenge of building a 'bargain' army where I recondition a whole army for a minimal cost to see if it can be done. Not for a while though as I've still got loads of Empire to paint before I get sidetracked. 


Saturday 13 October 2012

Emperor Karl Franz - Empire General Supreme!

At 555 point Karl Franz on Death Claw doesn't come cheep. If you upgrade his Reikland Runfang to Ghal Maraz that will cost you a further 30 points. However as Generals go he arguably the best. At first I was reluctant to have him in my fast response themed army at the quarter of the cost of a 2500 point army. I am sure that he will become a 'cannonball magnet' but for the occasion game he's great fun.


The base for this model is the same size as a chariot. (50mm x 100mm) This will give you an indication of the size of the overall model.


I followed the colour scheme in the book as close as my limited talent would allow me. The wings I gave a sand coloured base coat with layers of brown wash. The large outer feathers also had a coat of black wash to give a contrast. Through out I used citadel washes on this figure.


The front breast plate of deathclaw is packed with embossed detail. I am a little disappointed with the gap in the plating and my hopes that it would be covered in the paintwork were not realised. In time I will come back to the model to patch this up.


A side view shows the transition on the model between the 'tiger' and the 'bird'.


I still think that Karl's face needs some work to make it more realistic.