Sunday, 10 July 2011

How to make a Modular Wargaming Table - -Part 2

The last post saw the vast majority of work on this project. Essentially there are only two steps that haven't been shown.


The first was to paint the whole board with and 'undercoat' of paint so that the blue of the foam and the brown of the MDF is tied in. This colour does show through the sand in places so I felt the need to get a uniform colour. I used a simple poster paint that was reddish brown in colour as I felt that I was the closest to sandstone that I had.


Once dry I then went on to cover the flat areas of the terrain, and some sections of the slopes, with PVA or white glue as it is sometimes referred to. Sand is poured onto this wet glue and allowed to set. I left it overnight to ensure the glue had set properly. Excess sand is then removed and the step repeated if needed.This post is mainly here to give an example of the finished product.


This photo shows the stage of applying sand to the wet glue before any excess sand is removed.


Finally a couple of photos of the modular gaming table in one of its possible configurations. The floating scenery was made from off cuts of the blue foam used for the fixed hills (Remember never throw anything away! ;)

We played our first battle on it yesterday and it worked a treat. The battle will be uploaded to Youtube soon on our 'wargamingforfun' channel if you want to see it in action.

Monday, 4 July 2011

How to make a Modular Wargaming Table - -Part 1

I have played my wargames on the same green background for nearly a year now. With the release of the Tomb Kings from Games Workshop I thought now would be the ideal time to develop a desert landscape table top. I also decided to make the table top modular. The main advantage to this is that it's possible to vary each battle without have shelves upon shelf of scenery. Ideally when finished the table top will be able to stack upon itself being no more than six inches ( 15cm) high. 


This is more of a 'how I did it' rather than ' do this then do that' article. if you are going to follow these instruction please take all necessary safety precautions and ensure that you know how to use any tools safely and properly.


Step 1
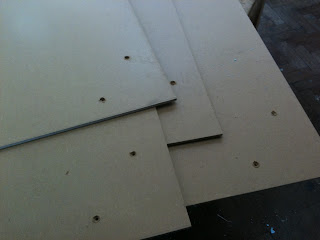
I decided to dived the traditional 6x4 gaming table into 2x2 squares placing scenery to four of the squares. I used 6mm MDF to make each of the six 2x2 wooden squares.

Step 2
Next I placed a piece of card (approximately 2x2) in the junction between the four square pieces of MDF.


Step 3
I drew an outline that I felt suitable for sandstone type hills. (Yes it does look a little like a wolf's head in many of the photos but that was purely by accident!) I was careful to ensure that each of the parts of the hill meet on the outside of each square on the junction lines. This will allow the 'turning' of the square for maximum compatibly.


Step 4
I removed the unwanted card to make a template for use on the blue foam to follow.


Step 5
I used the card template to draw around onto the blue foam. The blue foam that I used is around 2 inches (50mm) thick.


Step 6
It is important that the centre, or join lines, of the hills be added at this stage as well as it helps a great deal later lining up the blocks with the MDF boards.


Step 7 
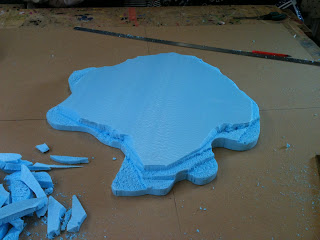
Cut of the blue foam. I used a simple band saw but you could always use a fret saw or a coping saw if required but it would obviously not result in a some finish as shown above. 


Step 8
This is one of the most time consuming and messy stages. In order to get the look of sandstone cut in to the side with a suitable backed saw. (Sometimes referred to as dove tail saws.) The break the foam by twisting the blade. I have seen this done with a large knife. As long as the blade can take the twisting motion without twisting you should obtain the required result.


When working around the outside of the hill network I tried to ensure that all of the joint lines were approximately the same height. Again this was to ensure maximum compatibility between different joints.


The completed hills.


Step 9
The next stage was to cut the four sections so that there is four separate hills.The set-up demonstrating the configuration to achieve one large hill.


This set-up shows the four pieces when arranged as two medium hill.


The final configuration demonstrating four small hills.

Step 10
In each of the four squares I drilled holes in the corners. The purpose of these is to hold the hills in place while the glue dries. The add a lot of strength to the finished table top but it is important to countersink these holes so that the screws do not damage the table that they are placed on.


Step 11 (and final step of part one!)
Ensure all of the pieces line up before you finally fix the foam to the MDF. Once you are happy place generous amounts of wood/PVA/white glue on the underside and screw to hold the blocks in place while the glue sets.

Sunday, 3 July 2011

Diary of a Dryad...

The local Games Workshop in Shrewsbury is having a competition based on Warhammer Fantasy Battalion Box-sets.


Basically you paint over the course of a month a battalion, a hero and a wizard. At the end of the month entries are judged and battles are fought using the figures painted. Handicaps are introduced to even out the army scores to ensure fair play.


I have always liked the look of the Wood Elves but never rated them as a fighting force, and the competition has helped me to come up with an excuse to own some. Having spent a day and a half basing and building the figures I have started by painting a 'test' dryad. The wood elf fluff states that the elves reflect the seasons of the forest in the colours and their appearance. I have decided to go for an autumnal look.


These are pictures of the 'test' dryad that I completed earlier today.

Useful Paint Brand Conversion Website

Spotted this from a recent Google search that I did.

http://www.totengraber.net/paintdb/index.php

I often find it frustrating when reading articles when the artist is using a brand of paints that I do not own. While most of the time it's possible to work out an alternative this site gives the direct equivalent is different brands.

The drop down menus of the left uses acronyms but they are straightforward to use. (eg. GW = games workshop, VGC = vallejo game colour)

No more guessing games!

Warhammer Fantasy Battle Report links for June 2011 - Wargamingforfun

Skaven vs High Elf 3000points
Blood & Glory Scenario
http://www.youtube.com/watch?v=SsAxQN2Jw8s


Dwarf vs High Elf 2000points
Battle for the Pass Scenario
http://www.youtube.com/watch?v=i0rzV4ngocU


Ogre Kingdoms vs Brettonnia 2000points
Blood & Glory Scenario
http://www.youtube.com/watch?v=04VjaddJFTc


Skaven vs Bretonnian 2000points
Meet & Engagement Scenario
http://www.youtube.com/watch?v=Ee6DBLgwXfk


Dwarf vs Warriors of Chaos 2500points
Battleline Scenario
http://www.youtube.com/watch?v=z4cbzHNB6vg


Hope you enjoy, please feel free to comment,


Ade

Back in Business

Where does the time go? It has been just over three months since my last post on this blog and I could have sworn that it was only a few weeks. 


There are a couple of reasons for this. Firstly as a school teacher teaching GCSE and 'A' level the spring term is manic. Trying to get all the coursework submitted for the deadline in May is our most stressful time of year. (Don't get me wrong, I love my job, and this is certainly not a moan, just giving out some background info!) Secondly and probably more interesting to the wargaming community is that I have been putting alot of time into my Youtube channel called 'wargamingforfun' check it out if you have time.


I'm back to the blog now and hope to do regular updates of my modelling and painting for those that are interested.